The Missing Semester- Tips for Scientists who code

This article/ series inspired by the MIT Missing Semester course lectures, which I thought was oriented much more towards computer scientists and goes through the shell, build processes, remote access etc. These topics are important, but I thought there should be something more oriented towards the types of work scientists like myself do, which largely comprise of signal/ data processing, analysis and its automation. I started making some reels on my own ‘Missing Semester’ and this is a longer written form of the same information.
Most scientists now code in the Python programming language, which is a high level language that is now taught in many universities and practically standard in industry.
Unlike physics/ mathematics, a lot of these are just tools that us humans have designed/ built to make things easier/ more convenient.
There’s nothing fundamental about any specific programming language or a packager, and these guidelines and ‘best’ practices may be superceded in the future. It’s more important to understand WHY we do this, say for reproducibility, modularity, separation of concerns, hardware independence etc.
We will move from setting up your environments to using AI for coding assistance
1. Environments and Conda
Have you ever wondered why there are so many different Pythons on your computer? Each is a different Python interpreter, which reads and runs your python file, line by line. Each interpreter has its own environment, which gives access to libraries (code that other people have written).
To find out which python interpreter you are using, you can do which python in your terminal.
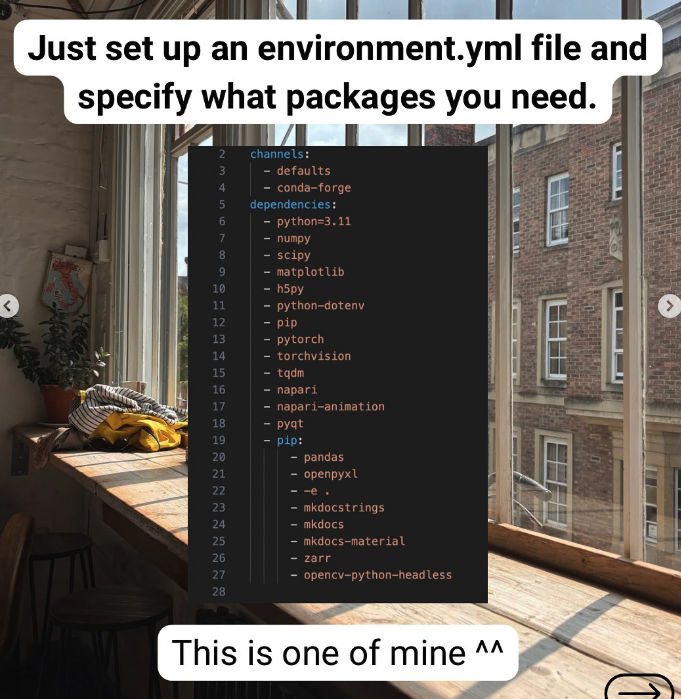
As we want analysis work to be reproducible and reusable, it is important to specify what libraries and packages the script requires, and also their versions. These are also called dependencies.
I use conda, which is a package manager. It’s super beginner friendly and you’ll see many repositories using this to specify dependencies using an environment.yml file. You then do conda env create --file environment.yml to create an environment using that file.
The other way usually taught is to use virtualenv with a requirements.txt file, but it doesn’t manage version conflicts of packages.
In short, you give recipe files to environment managers and specify what versions of Python and libraries your code should be run in so others can reproduce your findings.
2. Code organisation: Jupyter vs Python
I love Jupyter notebooks for quick prototyping—plots stick around, and it’s super fast to experiment with. There’s even VSCode extension for it!
But… analysis in notebooks is tough to reproduce, as code cells can be run in any order.
So here’s my approach: whenever I create a reusable function, I refactor it into a Python package and install it in editable mode.
Refactoring just means making the code flow better by shifting the code to another file/ restructuring it. These new modules can then be imported nicely inside another analysis notebook, following the ‘don’t repeat yourself’ (DRY) principle :)
Say I’ve copy and pasted my code into My code is now
my_repository
|_ my_package
    |_ my_file.py
    |_ __init__.py
|_ notebooks
    |_ data_analysis.ipynb
|_ pyproject.toml
|_ setup.py
You also need to create and a pyproject.toml.
# pyproject.toml
[build-system]
requires = ["setuptools", "wheel"]
build-backend = "setuptools.build_meta"
and a setup.py
# setup.py
from setuptools import find_packages, setup

setup(
    name="my_package",
    version="0.1.0",
    packages=find_packages(),
    install_requires=[],  # Add dependencies here
    author="",
    author_email="",
    description="A short description of your package",
    url="https://github.com/yourusername/your_package",
    classifiers=[
        "Programming Language :: Python :: 3",
        "Operating System :: OS Independent",
    ],
    python_requires=">=3.7",
)
I can now install my module in editable mode (-e), which means that any code I change in my module will instantly have effect, and there’s no need to reinstall pip install -e name_of_module.
In my Jupyter notebook (data_analysis.ipynb), I also put these two lines at the top
%load_ext autoreload
%autoreload 2
which ensures that any changes to my packages are instantly reflected in my Jupyter environment.
In this way, I keep prototyping separate from real development—making my code modular, reproducible, and reusable.
More info here and here for those who want deeper dives.
3. Git vs GitHub
Don’t make this common mistake—Git and GitHub are not the same thing. So, what’s Git?
Git is the standard version control system for programming projects. It tracks every line of change, lets you roll back if needed, and makes it possible for people to collaborate.
Version control systems track history
Think of a repository as your project, and a commit as a snapshot update. You can branch off, experiment, and later merge changes back into the main branch. And here’s the cool part—you don’t even need the internet. Git lives in a hidden .git folder on your computer.
Now, GitHub is different. It’s an online service built on top of Git—like Google Drive for code. It’s where you upload repositories to share, collaborate, and contribute with others. GitHub is just one of many platforms—others include GitLab and Bitbucket.
If you’re working with yourself, I’d recommend setting up your (remote) project on GitHub and then cloning it on your local PC.